
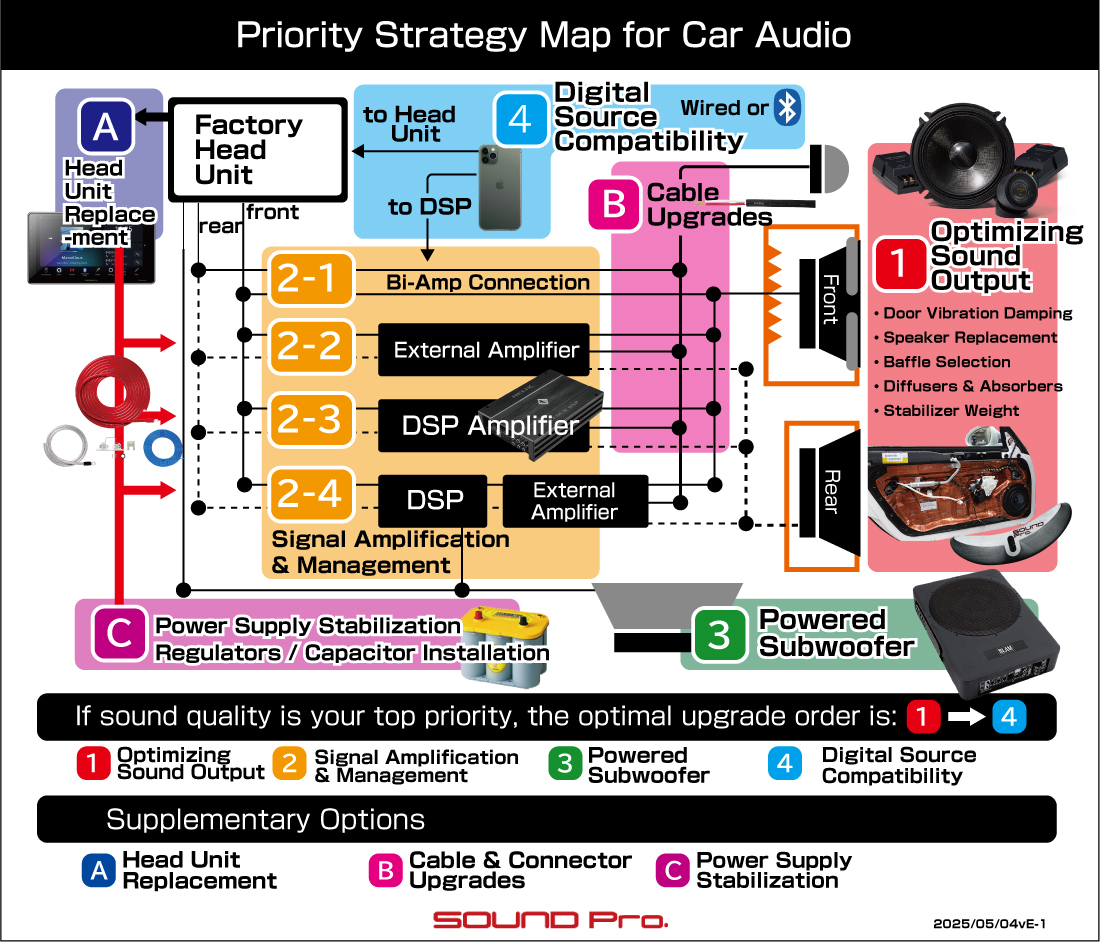
Priority Strategy Map for Car Audio
At our shop, we propose the following priorities as a guide for improving your car audio system’s sound quality.
Steps 1 through 4 form the essential foundation for building good sound. We recommend following them in order based on the level of sound quality you desire.
Items A through C do not necessarily follow Step 4, but should be considered depending on your vehicle’s condition and setup.
Please refer to the explanations below and review the sections that interest you.
- 1. Speaker Output Optimization (Properly Driving Factory-Positioned Speakers)
- 1-1. Building the Door as a Speaker Enclosure
- 1-1-1. Vibration Damping (Sound Deadening & Door Tuning)
- 1-1-2. Installing Sound Diffusion Materials
- 1-1-3. Damping and Sound Absorption of Door Trim
- 1-2. Speaker Replacement
- 1-3. Selecting a Speaker Baffle
- 1-3-1. Resin
- 1-3-2. Wood
- 1-3-3. Metal
- 1-3-4. Composite Material
- 1-4. Baffle Stabilizer and Weighting
- 1-5. Speaker Mounting Modification (Exposed Installation)
- 1-5-1. Outer Baffle
- 1-5-2. Tweeter Embedding
- 2. Signal Amplification, Processing, and Channel Separation (Optimizing the Electrical Signal to the Speakers)
- 2-1. Bi-Amp Connection
- 2-3. DSP Amplifier (DSP with Built-in Amplifier)
- 2-4. Standalone DSP + External Amplifier
- 3. Adding Components (Beyond Standard Layout Speakers)
- 3-1. Adding a Subwoofer
- 3-2. Upgrading to Front 3-Way System
- 4. Support for Digital Sources (Hi-Res Audio Playback)
- A. Replacing the Head Unit
- B. Reducing Signal Transmission Loss
- C. Ensuring Stable Power Supply
- C-1. Direct Battery Connection (Basic)
- C-2. Direct Battery Connection (Positive and Negative Simultaneously)
- C-3. Capacitor
- C-4. Power Stabilizer (Voltage Regulator)
1. Speaker Output Optimization (Properly Driving Factory-Positioned Speakers)
1-1. Building the Door as a Speaker Enclosure
While it’s common for cars to have speakers mounted in the doors as part of their entertainment features, this is more of a convenience addition rather than a serious effort to deliver high-quality sound. (After all, a car is primarily a means of transport—not an audio device.)
As a result, even if decent factory speakers are installed, the door—which functions as the speaker enclosure—usually has large service holes that compromise its ability to maintain internal air pressure and airtightness. These conditions are critical for proper speaker performance.
In short, the air pressure pushed out by the speaker cone immediately flows to the rear of the speaker, canceling out much of the intended physical sound output (especially in the low and high frequency ranges). This leads to a noticeable lack of sonic energy and clarity.
No matter how cheap a bookshelf speaker might be, it would never be designed with large holes in the box or weak panels that flex like a tissue box. That’s why creating a proper enclosure is a basic prerequisite—not advanced “tuning,” but simply the foundation needed to allow a full range of sound to be properly reproduced.
For this reason, if you want reasonable sound quality from a car audio system, the first step is to modify the door structure to (1) ensure a certain level of airtightness, and (2) eliminate rattling caused by speaker vibrations.
1-1-1. Vibration Damping (Deadening / Door Tuning)


One of the most effective ways to turn a car door into a functional speaker enclosure is by applying vibration damping materials—a process commonly known as “deadening.”
This involves sealing the service holes in the door panel with a material made of butyl rubber layered with aluminum sheet. Doing so solves the major issue of poor airtightness. In addition, by applying damping sheets to the remaining metal sections of the door—even those without service holes—you can reduce the door’s tendency to vibrate. This second step addresses the problem of resonance. To be effective, the damping material should be applied not only to the inner panel with the service holes but also to the outer panel (the metal skin of the door), as both transmit vibration.
At our shop, we classify this process into two main approaches:
- “Deadening,” which uses relatively heavy materials for a more rigid, performance-oriented result
- “Door tuning,” which uses lighter materials for a milder, more flexible effect
When the speakers are powered by a high-output external amplifier rather than the lower-output amp built into the head unit, we typically recommend the heavier deadening approach. Conversely, for systems driven by the internal amp, we suggest door tuning. That said, even when using an internal amp, if you're aiming to get the most out of high-performance speakers, it may be worthwhile to apply full deadening as a way of providing a more capable enclosure for them.
1-1-2. Installing Sound Diffusion Materials


A diffusion material is designed to scatter acoustic waves and is typically installed on the outer door panel, directly behind the speaker.
When a speaker vibrates, its diaphragm moves back and forth to push air forward. However, when the diaphragm moves backward, it pushes air into the inside of the door. If this air pressure hits the metal surface directly behind the speaker at a steep angle, it will reflect back at nearly the same angle—right into the back of the diaphragm. This reflected pressure interferes with the diaphragm’s motion, making it harder for the speaker to operate freely.
The result is a “congested” or “muffled” sound, lacking in both low and high frequency extension. This effect becomes more pronounced as volume increases.
Diffusion materials help mitigate this issue. These materials often resemble bumpy chocolate bars or coarse sponges, depending on the product. When placed behind the speaker, they scatter the rearward air pressure in multiple directions, reducing the direct reflections that interfere with the speaker’s movement.
While not as essential as deadening or door tuning, diffusion materials are highly recommended for users aiming for high-fidelity sound with enhanced clarity and resolution.
*This explanation focuses on the resistance that occurs when the diaphragm moves backward, but a similar resistance also occurs during forward movement. Both are caused by the same mechanism. By reducing air pressure reflections with diffusion materials, you can improve diaphragm movement in both directions equally.
1-1-3. Damping and Sound Absorption for Door Trim


As the name suggests, this step involves damping and treating the door trim—the inner paneling or lining of the door.
Unless you're using a special mounting method like an outer baffle, standard door speakers are mounted to the inner metal panel (inner panel). While most of the sound waves from the speaker pass through the speaker grille built into the door trim and into the cabin, some energy is also directed into the space between the inner panel and the trim. This wave energy causes the door trim to vibrate. Depending on the trim’s material, weight, and the system’s volume, these vibrations can result in audible rattling or buzzing noises.
To address this, we apply vibration damping materials to the back side of the door trim—a process known as door trim deadening. By strategically placing a composite material made of butyl rubber and aluminum sheet, we add mass to the trim and suppress resonance.
In parallel, sound-absorbing materials can also be highly effective. While the damping approach focuses on preventing the trim from vibrating in response to sound waves, sound absorption aims to eliminate the waves themselves by applying thick, soft materials behind the trim (more like filling the space than just attaching a layer).
If you use an outer baffle setup that exposes the speaker diaphragm outside the trim, much less energy enters the space behind the trim, and sound absorption becomes less necessary. But if you're aiming for high-fidelity sound using the standard factory layout, we recommend applying both damping and absorption materials to the door trim for optimal results.
1-2. Speaker Replacement


Speakers, which convert the electrical signals from the head unit into air vibrations, are the component that most directly affects what you hear in a car audio system.
They work by using a coil to convert electrical variations into magnetic force. This coil interacts with a permanent magnet mounted on the back of the speaker, and the diaphragm attached to the coil moves back and forth to vibrate the air and create sound.
The performance of a speaker is determined by various factors, such as:
- the strength of the magnet,
- the stiffness and weight of the bobbin (which holds the coil),
- the material and winding method of the coil,
- the stiffness and weight of the diaphragm,
- the softness of the surround (which supports the diaphragm), and
- the rigidity of the speaker basket (the metal frame).
Key measurable specifications for evaluating speaker performance include (e.g., for the Carrozzeria TS-V173S):
- frequency response range (e.g., 31 Hz–65,000 Hz),
- rated power (e.g., 50W),
- peak power (e.g., 180W),
- sensitivity/output sound pressure level (e.g., 90 dB),
- and impedance (e.g., 4Ω), which is a prerequisite for proper operation.
So, how should you interpret these values when choosing a product?
Frankly, the best answer is: “Listen and see if it matches your preference.”
Yes, speakers with a wider frequency range often sound more extended in both lows and highs, and those with higher sensitivity ratings tend to deliver punchier, more dynamic sound thanks to their lightweight diaphragms. But naturally, the better the specs, the higher the price. In a free market, where manufacturers invest heavily to develop high-performance products, this is inevitable—though there are occasional hidden gems.
Ideally, you should listen before buying. If that’s not possible, reading reviews or telling us your budget and preferred music genres can help us recommend suitable models.
One important point we want to stress:
No matter how expensive a speaker is, it’s just a component. To bring out its full potential, two conditions must be met:
- proper installation using a solid baffle, and
- an acoustically sealed, vibration-resistant speaker enclosure.
We don’t expect every customer to go for full-scale deadening and reinforcement, but at a minimum, we strongly recommend using appropriate damping materials and a well-matched baffle within your budget.
1-3. Selecting a Speaker Baffle


When installing speakers into a car door—except for certain bolt-on trade-in models—you'll typically need to use a ring-shaped part called a “baffle.”
The primary function of the baffle is to physically secure the speaker in place and prevent any looseness or rattling. All commercial baffle products fulfill this role, but they come in various types with different characteristics and price points.
1-3-1. Resin


This is the most affordable type of baffle available.
Its main selling point is its ability to secure the speaker firmly, rather than offering any sonic benefits. While its low price is appealing, resin is lightweight and lacks rigidity, which results in poor vibration damping. Without additional treatment, vibrations can travel through the baffle and into the inner door panel, muddying the sound by feeding unwanted resonance back into the speaker diaphragm.
This issue can be partially resolved by reinforcing the area around the baffle with damping material during installation. We recommend putting in that extra effort to improve sound quality.
1-3-2. Wood


Wood is the most traditional and widely used material for speaker baffles.
While softer than resin or metal and thus potentially seen as inferior in physical rigidity, wood can absorb peak vibrations from the speaker basket and often imparts a natural, mellow character to the sound. While this is a subjective quality that's hard to quantify, our analog ears seem to favor this kind of acoustic softness. Because of this, wood continues to offer unique advantages.
The most common material is MDF (medium-density fiberboard), made by bonding wood fibers with adhesive. High-end baffles may use white birch sourced from high-latitude regions such as Finland or Russia. However, standard MDF sold at hardware stores often falls short in terms of hardness and moisture resistance. For automotive use, we recommend hard-type MDF, such as that manufactured by Starwood HOKUSHIN Co., Ltd.
The typical process involves cutting the wood into a ring shape, adding bolt holes, beveling the inner edge for better airflow, and applying waterproofing treatment. Wood is also commonly used when building outer baffles around the speaker.
1-3-3. Metal


In recent years, metal baffles have gained more presence in the market.
Most are made from aluminum (often duralumin), though newer options include cast iron (die-cast types). Compared to wood or resin, metals offer superior rigidity, which provides several advantages:
- They allow for extremely firm and stable mounting.
- Because of their strength, even ultra-thin baffles can maintain reliable structural integrity—useful when space is very tight.
- They are also highly stable and resistant to deterioration from moisture.
One point to note, however, is that due to their hardness, metal baffles lack the “forgiveness” or problem-solving flexibility of wood. In other words, they tend to deliver sound that is very true to the speaker itself—clear and precise, but possibly lacking in warmth or richness.
Whether that’s a positive or negative depends entirely on your goals. If your aim is to eliminate the acoustic colorations that come with wood and let a powerful external amplifier dictate the system’s character, metal baffles can be the ideal choice to bring out that precision.
1-3-4. Composite Materials


As the name implies, composite baffles are made by combining two or more different materials.
A well-known commercial example is the “Hybrid Metal Die-Cast Inner Baffle” series from Carrozzeria. These products feature a hybrid structure where an aluminum flange is integrated with a die-cast metal base.
Custom-made baffles at specialty shops often take a similar approach. For example, a base of MDF may be combined with one or more rings made of iron, aluminum, or acrylic to form the flange section. These multi-material constructions aim to deliver stable acoustic performance across the entire frequency spectrum.
Each material has its own unique physical properties and resonant behavior (the tendency of a material to vibrate at certain frequencies). While we won’t detail each here, the purpose of combining materials is to reduce the influence any one material might have over a specific frequency range.
All materials have a natural resonant frequency at which they tend to vibrate when excited. If the audio signal hits that frequency, it can cause subtle coloration or distortion in the sound. By layering or combining multiple materials with different resonant characteristics, these effects can be minimized across the full playback range.
For those upgrading their speakers using the factory layout, Carrozzeria’s hybrid two-material baffles are a convenient off-the-shelf solution. But for more serious custom builds—whether standard layout or outer baffle installations—using two or even three materials allows for more precise and stable performance.
1-4. Baffle Stabilizer Weights


This is our original product, designed to block the adverse effects of vibration transmitted from the speaker to the door structure.
Although it could be introduced alongside door deadening and tuning as part of a broader vibration-control strategy, it’s most commonly installed during speaker or baffle replacement, which is why we’ve included it here.
The Baffle Stabilizer Weight is installed on the inner side of the door, directly behind the speaker baffle. Its primary purpose is to counteract the backward motion of the speaker basket that occurs as a reaction when the diaphragm moves forward. This reaction can partially cancel out the diaphragm’s movement and degrade sound quality. The stabilizer weight helps suppress this effect.
Each weight is shaped like a small banana and weighs around 320 grams. It is mounted using the same bolts that secure the speaker baffle, effectively increasing the mass around the speaker. This additional mass helps absorb the reactive energy and allows the diaphragm to move more cleanly and consistently.
The result is tighter bass response that lays a solid foundation for the entire frequency range. Low frequencies are extended, mid- and high-frequency detail becomes clearer, the soundstage expands, and imaging becomes more defined.
In real-world feedback, customers have reported that “bass extension improved noticeably after installation, and low frequencies remained clearly audible even at lower volumes.” This is likely because the weight suppresses out-of-phase vibrations around the speaker, allowing the diaphragm’s motion to be expressed more directly.
In systems equipped with DSP that allow for per-speaker frequency adjustments, the stabilizer offers further benefits. Previously, to compensate for bass loss, it was necessary to assign the woofer a broader and louder frequency range. But with stabilization, the woofer’s range can be narrowed and its volume reduced. This allows the lower limit of the tweeter (or squawker) to shift downward, enabling it to express its full potential without being overpowered by the woofer—unlocking a level of high-fidelity performance that’s difficult to achieve otherwise.
1-5. Changing Speaker Mounting Method (Exposed Type)
When upgrading speakers, the most common approach is to replace them using the factory layout. This method keeps costs down and preserves the original appearance of the interior. However, for users seeking higher sound quality, an alternative idea is to install the speakers in an exposed configuration to eliminate any obstacles in front of the speaker units.
1-5-1. Outer Baffle


This is a method for installing woofers (door speakers).
While the mounting location remains mostly the same as the standard setup, the key difference is that the inner baffle is built up in height so that the speaker protrudes through the door trim and becomes exposed on the surface.
In a standard inner baffle installation, the speaker’s sound has to pass through a grille embedded in the interior panel, and the hollow space behind that panel can act as an acoustic cavity that negatively affects the output. As a result, the full vibration energy of the diaphragm does not reach the cabin. By contrast, with an outer baffle, the diaphragm is physically visible—completely exposed—eliminating such acoustic obstructions.
In addition to removing resistance, another major benefit is improved sound projection. By positioning the speaker on a flat or slightly convex surface, like the top of a hill, the sound waves can travel forward more directly and efficiently.
While outer baffles offer clear performance advantages, there are some considerations:
- Cost (starting from around ¥70,000 for both doors)
- Modification of the door trim
That said, since original trim panels can be repurchased, the factory condition can be fully restored later. We encourage you to weigh these factors against the acoustic benefits when making a decision.
It’s also important to carefully design the structure when implementing an outer baffle. Because the speaker is mounted higher, the distance from the inner door panel increases, which means the baffle tube inside the door becomes longer. This can add airflow resistance within the tube. To minimize that, we machine the inner tube into a tapered shape (wider toward the rear) and apply enhanced waterproofing, especially since more wood material is used.
We take great pride in both our technical skill in outer baffle fabrication and our ability to blend the design with the interior. If your budget allows, we highly recommend considering an outer baffle upgrade.
Examples of Outer Baffle Installations
1-5-2. Tweeter Flush Mounting


Just like with woofer outer baffles, tweeters can also be installed in an exposed configuration.
When a vehicle comes equipped with separate tweeters as standard, they are typically installed behind mesh grilles on the dashboard or partway up the A-pillar. Replacing the tweeter in the same position is the most common method—but as with woofer grilles, these mesh covers inevitably act as acoustic obstructions.
An easy and low-cost way to expose the tweeter is to use the included surface-mount stands (common with domestic speaker sets) and place the tweeter on top of the dashboard. While this is a simple approach, the placement is limited to the dashboard surface and may not blend seamlessly with the interior design.
For users seeking a more integrated and refined appearance, we recommend flush-mounting the tweeters into the A-pillars. By carving a recess into the middle of the A-pillar and embedding the tweeter, you can achieve a clean exposed look while positioning the sound image higher in the cabin—improving focus and spatial clarity.
Additionally, the mounting angle and design of the recess can be customized, allowing for symmetry between left and right channels, or angling the tweeters toward the driver for optimized imaging.
Many audio shops offer this service, but just like with our outer baffles, we take great pride in both the design and finishing quality. If you're looking for a stylish, high-quality result, we sincerely believe you'll be satisfied with our work.
While there’s no dedicated showcase of just tweeter flush-mounting, many of our outer baffle examples include tweeter embedding as part of the installation. Feel free to explore the gallery below:
Examples of Outer Baffle Installations (Many Include Tweeter Flush Mounting)
2. Signal Amplification, Control, and Channel Separation (Optimizing the Electrical Signal Supplied to the Speakers)
Once you've optimized the speaker environment around the doors and tweeters—the “exit point” for sound—the next major focus is how to manage the signal being delivered to them.
Phrases like “no weird noise” or “minimal distortion” might give you a general idea of what we mean. Indeed, minimizing noise and distortion is one of the most important benchmarks of audio quality. It may sound simple on the surface, but achieving this requires careful attention to two things:
First is the overall performance of the amplifier, which boosts the weak electrical signal coming from the playback device to a level that can properly drive the speakers.
Second is the concept of “channel separation,” in which separate amplification paths are used for each speaker or tweeter, preventing unwanted interference between them.
In this section, we’ll explore how to upgrade the amplification system to reduce noise and distortion. We'll also explain how to use a DSP (digital signal processor) to send slightly different signals to each speaker, allowing the entire speaker system to work together to create a unified and immersive sound image.
2-1. Bi-Amp Connection
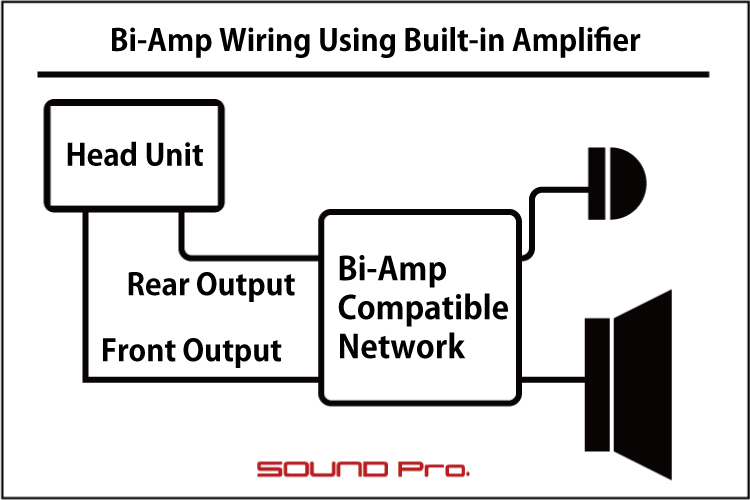
This is one of the most cost-effective ways to achieve the benefits of channel separation—dedicated signal paths for each speaker.
Factory and dealer-installed audio systems, as well as aftermarket head units and navigation systems, typically come with built-in amplifiers—often referred to as "internal amps." These units almost always include 4-channel output: front left/right and rear left/right.
In many vehicles, the front speakers are configured as a 2-way setup, with woofers in the doors and tweeters near the dashboard. However, these two speakers per side share the same amplifier channel; the signal is simply split. While 2-way systems offer improved clarity by letting the woofer handle lows and the tweeter handle highs, using a single shared signal path means that energy from the woofer’s movement—specifically reverse current generated by its motor (coil and magnet)—can feed back into the circuit and interfere with the tweeter’s operation.
This is where channel separation becomes important. In a bi-amp setup, you assign separate amplifier channels to each speaker unit—woofer and tweeter—thereby eliminating mutual interference.
As mentioned, your head unit has four amplifier channels originally assigned to the front and rear speakers. In a bi-amp configuration, all four channels are reallocated to just the front 2-way setup: one channel for each woofer and tweeter (left and right). This means the rear speakers become inactive, but in return, the woofers and tweeters operate independently, free from interference. While the woofer’s performance may remain relatively unchanged, the tweeter benefits significantly, no longer disrupted by strong feedback currents, resulting in clearer high-frequency detail and a more transparent overall sound.
2-2. External Amplifier
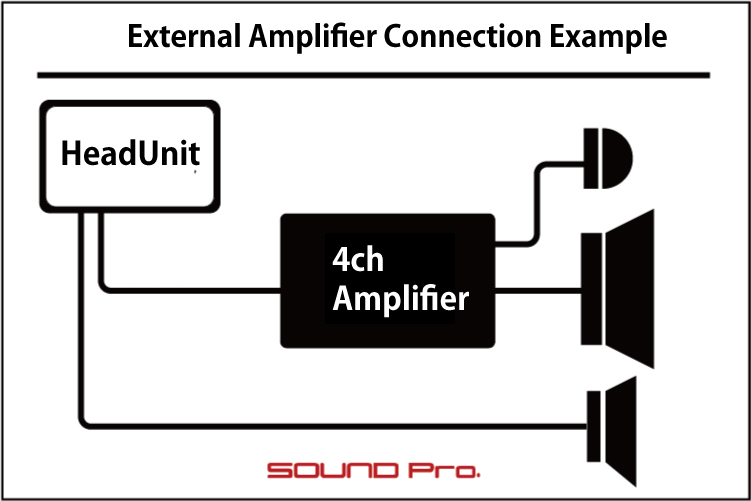
Unlike the built-in amplifier found in head units (including nav or audio decks), an external amplifier is a standalone device designed purely for signal amplification. Sometimes called a “separate amp,” it provides significantly better performance.
In the previous section, we focused on the benefits of channel separation. But when evaluating amplifiers themselves, it’s important to assess how effectively they amplify weak signals to speaker-driving levels. While internal amps aren’t necessarily useless, they operate in very limited space, with compact components, tight circuitry, and relatively weak power sections. In contrast, external amplifiers use higher-grade parts, spacious circuit layouts, and more robust power supplies—resulting in cleaner, lower-distortion output.
Adding an external amplifier clearly improves amplification performance. However, it’s also important to consider how the signal channels are configured. For example, if the four channels from your head unit are routed into a 4-channel amplifier and then output as front/rear left/right, the signal path remains mostly the same as before. In this case, while amplification improves, channel separation does not.
But if you instead assign all four amplifier outputs to a front 2-way setup (woofer and tweeter per side), you get the benefit of both improved amplification and channel separation—just like in the bi-amp configuration described earlier.
For even better performance, you can use two separate 2-channel amplifiers—one dedicated to the tweeters and one to the woofers. Although this consumes the same number of channels (4 total), using separate physical amps ensures that each frequency range has an entirely independent circuit and power supply, minimizing interference. This results in superior channel separation and the highest clarity attainable under realistic conditions. (While using four individual 1-channel amps is theoretically possible, it’s generally impractical for car audio applications.)
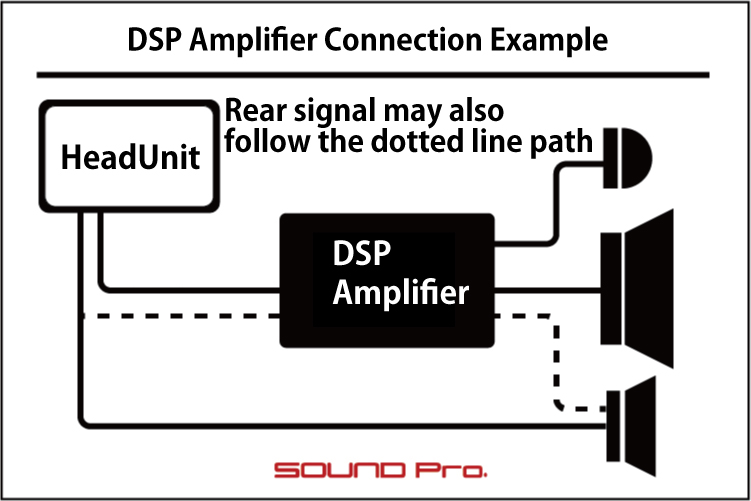
2-3. DSP Amplifier (DSP with Built-in Amplifier)
This has become the mainstream option in recent years.
A DSP (Digital Signal Processor) is a device that processes the input signal from a head unit or navigation system, offering functions such as: (1) crossover filtering to set upper/lower frequency limits for each output channel, (2) time alignment to adjust signal timing, and (3) equalization to fine-tune output levels by frequency range.
A standalone DSP does not amplify the signal itself, so an amplifier is still needed to drive the speakers. A DSP amplifier combines both DSP processing and amplification in a single unit for convenience.
These units are sold with varying specifications—6ch, 8ch, or 12ch DSP processing capabilities—paired with an equal or slightly reduced number of built-in amplifier channels.
A typical setup might involve connecting the head unit’s 2-channel front output into the DSP amp, and using 4 amplifier channels to drive a front 2-way speaker system. Adding rear channels may require a 6-channel model. If a subwoofer is needed, you can either connect a powered subwoofer to the DSP amp’s pre-out or use one of the unused built-in amp channels for a passive sub.
While 6-channel DSPs are common in mid-range products, some high-end vehicles have factory-installed multi-channel amps that output already-divided frequency signals. In such cases, full-range signals may not be available on a single channel, or you may want to assign specific signals for front and rear seating areas. To handle such configurations, high-end DSP units offering up to 12 input channels are now available.
2-4. Standalone DSP + External Amplifier

This setup uses a standalone DSP unit (with no built-in amplifier) in combination with one or more external amplifiers.
As described in the earlier sections on bi-amp setups and external amps, a key benefit of a DSP-only unit is its stability. Since it does not include an amplifier—which draws high current and can introduce noise—it operates more cleanly and predictably.
Separating the DSP and amplifier into individual components allows each to function more stably. Moreover, you can go a step further by dividing amplification tasks across multiple external amps: for example, one amp for high frequencies (2ch), another for low frequencies (2ch), and a third for the subwoofer (1ch). This level of segmentation minimizes mutual interference and enables extremely clean signal delivery.
In addition to signal purity, this configuration also offers future flexibility. While a DSP amplifier technically allows the addition of external amps, its built-in amp section becomes redundant and cannot be recovered. With a standalone DSP, you can upgrade or replace amplifiers freely without waste—and even sell or repurpose the old amp—making this setup an appealing long-term option.
3. Adding Extra Speaker Units (Beyond the Standard Layout)
In Section 1, we discussed how to upgrade the standard speaker layout and optimize conditions to bring out the full performance of those speakers. Here, we’ll focus on adding speaker units that are not part of the vehicle’s standard configuration.
First, we’ll look at subwoofers, which reinforce low-frequency output. Second, we’ll introduce midrange drivers (also called squawkers), which are used to convert a standard 2-way front speaker setup into a 3-way system—functionally different from subwoofers but equally important in achieving a more detailed and balanced sound.
3-1. Adding a Subwoofer


Subwoofers are often seen as devices that produce deep, booming bass to create an energetic vibe. While that’s not incorrect—and heavy bass can certainly be fun—in the world of hi-fi audio where faithful sound reproduction is the goal, subwoofers play a more refined role. Their purpose is to reproduce the fundamental tones (the lowest frequencies in the sound spectrum) which, in turn, enhance harmonics and allow the mid and high ranges to shine with clarity.
In terms of frequency, subwoofers typically operate below 80 Hz—or even below 50 Hz—producing sounds so low they are often felt as air movement rather than heard. While you might not consciously notice them when active, turning the subwoofer off suddenly reveals how much presence and richness it had contributed. The mid and high frequencies sound noticeably thinner without it.
Subwoofers generally come in two types: (1) powered subwoofers, which include a built-in amplifier and power supply, and (2) box-type subwoofers with large 25 to 30 cm drivers housed in an enclosure, which require an external amplifier for operation.
Powered subwoofers are easy to install. They can receive signal from a DSP’s pre-out, a head unit’s pre-out, or even be tapped from the speaker-level output—no DSP is strictly required. In contrast, box-type subwoofers need an external amplifier to drive them. One option is to allocate a channel from the separate amplifier system discussed in Section 2-2, but more commonly, one channel from a DSP amplifier is used. If using a non-amplified DSP setup, pairing it with a dedicated high-output mono amplifier will allow for more accurate and powerful subwoofer performance.
3-2. Upgrading to a Front 3-Way System


As the title suggests, this refers to upgrading a standard front 2-way speaker system by adding a third unit to create a 3-way configuration.
Most stereo speakers originally started as a single full-range pair. For many years, this was considered adequate, but eventually it became apparent that as volume increased, high frequencies would begin to distort or disappear. The reason was that the speaker cone’s large movements required for low-frequency reproduction interfered with the delicate movements needed for high frequencies—this is known as “cone breakup.”
To solve this issue, multi-way speaker systems were developed that divide the audio spectrum across multiple dedicated drivers. Initially, this led to 2-way systems with separate tweeters and woofers. (Before 2-way systems, some speakers used dual-cone designs to extend high-frequency response.)
By narrowing the frequency range handled by each driver, distortion is significantly reduced and each driver can perform with greater clarity. When combined, the full system produces stronger bass and cleaner highs compared to single full-range speakers.
Extending this same logic further leads to 3-way systems. Rather than splitting the audio spectrum between just two drivers (tweeter and woofer), we add a third—called a midrange or squawker—to handle the middle frequencies more efficiently.
Numerically speaking, a typical 2-way system uses a crossover point of around 3–4 kHz between the tweeter and woofer. In a 3-way setup, the crossover points are more refined: tweeter to midrange (4–5 kHz), and midrange to woofer (around 400–500 Hz). This means tweeters no longer need to reach down into the lower ranges, and woofers aren’t stretched to cover upper mids—resulting in lower distortion and smoother overall performance.
In practice, 2-way systems typically place tweeters in the A-pillar or deep on the dashboard. For 3-way upgrades, one common approach is to keep the tweeter in place and embed the midrange unit into the upper part of the door trim. However, since mid and high frequencies are more directional, it’s better to position them as close together as possible, with minimal front-back offset to reduce phase shift. That’s why a popular method is to install both the tweeter and midrange side-by-side in the mid-to-lower section of the A-pillar.
4. Digital Source Integration (High-Resolution Audio Playback)
Once the speaker environment (at the output end) and the amplification/control stage (via amplifier or DSP amplifier) have been properly established, you're ready to play high-quality signals.
This section briefly explains how to play high-resolution audio from digital sources like smartphones or dedicated digital audio players (DAPs).
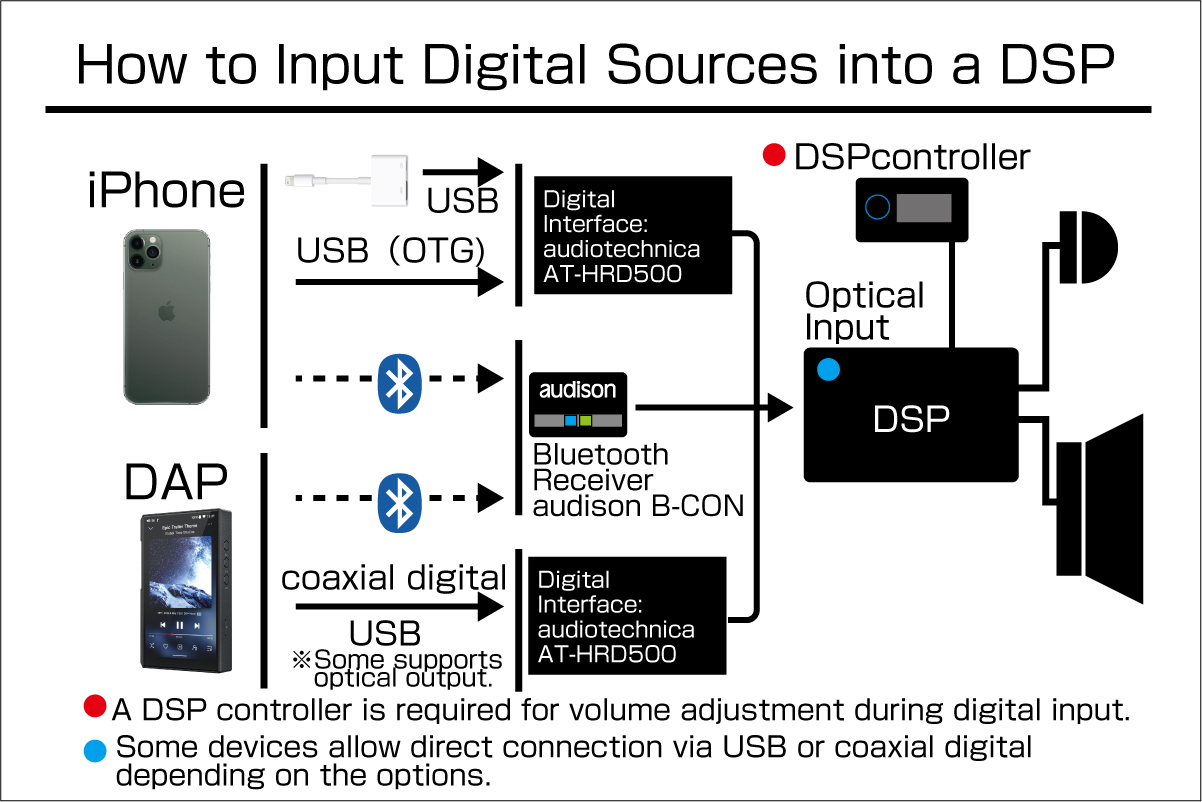
As shown in the diagram, most DSP (or DSP amplifiers) accept input via optical digital (TOSLINK), so you’ll need to prepare the appropriate interface based on your device and preferred connection method.
For smartphones such as iPhones, you can connect via USB or Bluetooth. For wired USB connections, you'll need a digital interface that converts the signal to optical output. For Bluetooth connections, use a Bluetooth receiver that outputs optical.
Higher-end DAPs that focus on premium playback often support not only USB and Bluetooth, but also coaxial digital output. Since many digital interfaces support both optical and coaxial formats, either can be used. Many customers tend to prefer coaxial digital connections. If you want the convenience of wireless Bluetooth even with a DAP, you’ll need a Bluetooth receiver just as you would with an iPhone.
Below are examples of actual installations that allow smartphone or DAP input. On each linked page, the second image shows a system diagram, which may help you better understand the full setup:
Example using USB-connected iPhone: Ferrari 458
Example using USB-connected iPhone: Lexus LC500h
Example using Bluetooth-connected iPhone: Land Rover Defender 110
Example using coaxial-connected DAP: Jimny Sierra
Example using Bluetooth-connected DAP: Levorg STI Sport (VN model)
Example supporting both coaxial DAP and Bluetooth iPhone: Levorg STI Sport (VM model)
Example with DSP amp that supports Bluetooth input: Crown Majesta
A. Head Unit Replacement


This section covers head unit replacement.
For both new and used cars, the head unit area generally falls into one of the following four categories:
(1) A manufacturer-specific navigation or display audio system (non-DIN standard, and often integrated with other functions, making removal complicated)
(2) A vehicle with a 2DIN slot and a 2DIN-type navigation system (including dealer-installed, OEM, or aftermarket units)
(3) A vehicle with a 1DIN slot and a 1DIN-type audio deck
(4) A vehicle with a manufacturer-specific audio deck (non-DIN standard)
Here’s how we can assist with these configurations:
For case (1), which includes everything from older Toyota Electro Multi Vision systems to current display audio setups and various custom-built navigation systems in foreign cars, this is likely the most common type.
When aiming to improve sound quality in such cars, the typical approach is to leave the head unit untouched, input the speaker output into a DSP amplifier, and use that to drive the factory speaker layout. However, in older vehicles, customers often want to replace the head unit itself. In these cases, we assess whether removing the OEM navigation unit is feasible. If so, we fabricate a 2DIN-compatible panel and install an aftermarket unit. If removal might cause system malfunctions, we extend the wiring and relocate the OEM unit (e.g., under a seat or in the trunk), while still installing a 2DIN unit at the front.
For foreign sports cars with beautifully integrated dashboards that are impractical to modify, we create a 1DIN or 2DIN installation space below the dash when possible.
Example: Nissan GT-R with the A/C panel relocated to the roof to accommodate a display audio unit
Example: Ferrari 488 with a 1DIN installation space added below the dashboard
Example: Maserati Quattroporte with OEM navigation relocated to the trunk and 2DIN navigation installed
Example: Abarth 595 with OEM display audio relocated under the seat and 2DIN navigation installed
For case (2), this is the easiest scenario for replacement.
If the navigation data is still up to date, there's no need to replace it. But if you choose to upgrade, swapping to another navigation or display audio unit is straightforward with no modifications required.
For case (3), this is similarly simple, as there is a DIN slot available.
However, because no 1DIN navigation or display audio units exist today, the options are limited to 1DIN audio decks (AV head units). Among current offerings, Pioneer (Carrozzeria) provides the widest selection.
For case (4), where the OEM head unit is non-standard and difficult to modify, you’re left with two choices: use an external DSP system, or—like case (1)—remove or relocate the OEM unit and install your desired replacement.
Toyota vehicles tend to have complex integrated systems that are best left untouched. However, one of our most frequent requests involves the current (ND) Mazda Roadster, which has a relatively simple internal structure. We often remove the OEM segment audio system, fabricate a custom audio panel, and install a 1DIN head unit.
Below are some examples from Mazda Roadsters, where we removed the segment audio system and custom-made the installation panel:
Example: 9-inch display audio unit installed in ND Roadster 990S
Example: 11-inch display audio unit installed in ND Roadster 990S
Example: 1DIN audio deck installed in ND Roadster 990S
B. Minimizing Signal Loss During Transmission


Electrical wiring is always involved when connecting electronic devices. The most basic performance requirement for such cables is current capacity—thinner for low currents, thicker for high currents. The next concern is noise resistance. When current flows through a conductor (such as copper), it can be affected by surrounding electromagnetic waves and vibration-induced noise.
Most general electronic devices are internally protected via board-level shielding and component insulation, and even external wiring like power and LAN cables are protected by insulation layers and outer sheaths.
In car audio, two types of current are handled: relatively strong current for powering devices (12V, 5A–100A), and relatively weak signals for audio transmission (around 5V for RCA output, up to around 20V for speaker output).
From a noise-resistance standpoint, the weaker signal side is obviously vulnerable, but even the stronger current lines can act as noise entry points. Therefore, in addition to selecting proper cables, routing and connection methods also require attention.
In terms of performance, selecting a suitable wire thickness for current flow is straightforward, so the main concern becomes the cable's "purity." This overlaps with the noise discussion, but depending on the purity and manufacturing method of the copper, signal transmission can behave differently—affecting the clarity of treble or the forwardness of sound. While such comments might earn laughs from engineers, blind A/B testing often reveals noticeable, non-placebo differences.
OEM speakers and cables are often undervalued, but we believe stock wiring is generally not that bad. It has relatively neutral characteristics, and for casual hi-fi improvement with factory decks and proper door treatments, OEM cables are sufficient and require no extra cost.
However, if you want to enjoy your music in a more pure, detailed hi-fi environment, investing in higher-grade cables may be worthwhile.
It’s also worth paying attention to contact points—where cables connect to each other or to devices. Using high-quality connectors, spade terminals, or fuse holders with low contact resistance can also impact audio clarity.
Lastly, regarding the physical impact on your vehicle when routing aftermarket wiring—this has become a bigger concern as more customers are resale-conscious.
Factory wiring harnesses are designed for easy, tool-free installation using snap-on connectors (couplers). At our shop, we consider minimizing vehicle damage as part of quality workmanship. So we offer adapter couplers that connect to factory harnesses without modifying or damaging them. Even when routing aftermarket speaker wire through tight door hinges, we carefully pre-process the cable and plan the routing to reduce strain and preserve vehicle integrity.
C. Ensuring Power Supply Stability
For all electronic devices—not just audio systems—delivering rated performance depends on a stable power supply. Just as household devices rely on a steady 100V supply, vehicles operate on 12V or 24V. As long as this voltage is present, manufacturers consider the environment acceptable.
However, in real-world automotive environments, voltage fluctuates significantly due to load changes such as headlights turning on, electric motors like power windows or wipers operating, or systems like air conditioners and alternators kicking in. These fluctuations can range widely, from well below 10V to brief spikes approaching 20V. Installing power-hungry audio components like amplifiers into such conditions may exacerbate instability, as the system may be unable to draw the necessary current—resulting in degraded or erratic performance, or even outright failure to operate.
To ensure your audio equipment performs reliably and consistently under such conditions, we strongly recommend the use of properly routed and rated power cables, along with auxiliary components that stabilize voltage fluctuations.
C-1. Direct Power from Battery
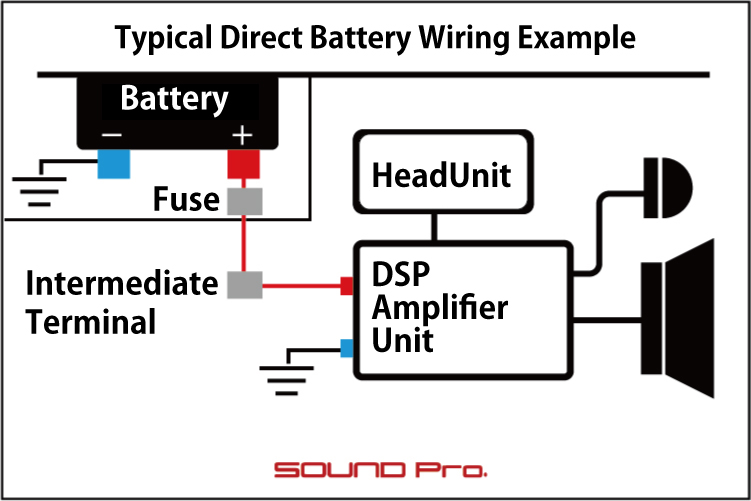
This term—well-known even among car audio beginners—refers to the direct routing of power into the vehicle cabin.
As a general rule, when installing power-hungry devices like amplifiers or DSP amplifiers inside the vehicle, a direct power connection from the battery is essential. The Japanese nickname "bat-choku" (バッ直) is a shortened form of "battery direct," indicating that the power cable is connected directly to the positive terminal of the battery (usually located in the engine bay or trunk) and routed into the cabin.
The thickness of the power cable and the rating of the in-line fuse should be determined with ample margin, based on the total current draw of the amplifier system. For example, with the popular DSP amplifier "audison AF C8.14 bit," the idle current is 1.4A, while the maximum current at full volume is 34A. In this case, a power supply kit like the Audio-Technica TPK-800R (8-gauge cable, 65A current rating, 60A fuse) would suffice. For more powerful multi-amp setups, thicker cables such as 4-gauge (TPK-400R: 115A rating, 80A fuse), or even 2-gauge (150A rating, 100–125A fuse) may be required. At this level, kits are generally unavailable, and components must be selected individually.
As for wiring, the positive cable is run directly from the battery’s positive terminal as noted above. The negative (ground) cable, however, is typically connected to a metal part of the vehicle body near the amplifier’s installation point (such as the trunk floor), since the car body is already grounded to the battery's negative terminal.
C-2. Direct Power from Battery: Positive & Negative
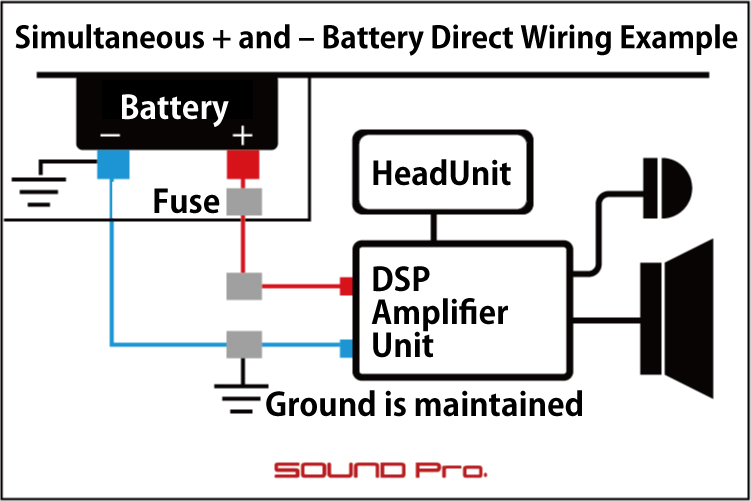
While the objective is the same as in section C-1, this variation features an additional refinement in how the wiring is routed: instead of just connecting the positive cable, both the positive and negative lines are routed directly from the battery into the cabin.
As explained in the previous section, while the positive side uses a thick cable directly from the battery, the negative side is typically grounded to the vehicle body. However, the resistance of the vehicle body and that of a direct cable can differ, resulting in imbalance. By routing both positive and negative lines with cables of equal thickness, you reduce this discrepancy and ensure smoother current flow.
Naturally, this method doesn’t increase the current itself, but by lowering the total resistance of the power circuit, it improves overall sound quality and enhances the responsiveness of the audio signal.
C-3. Capacitor
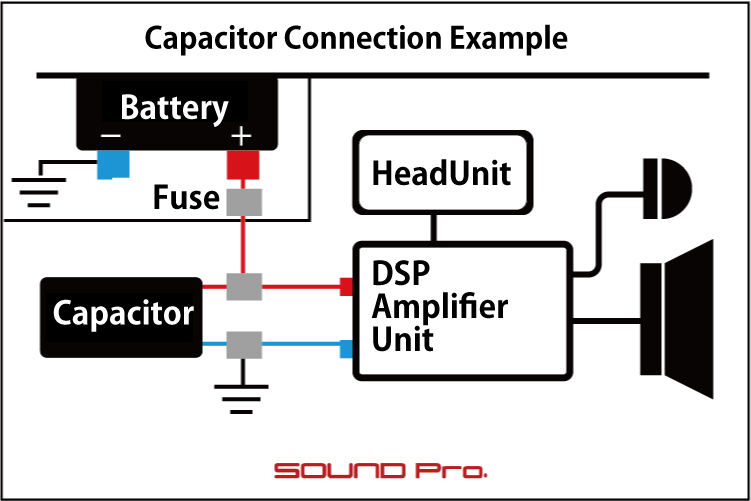
This is a device that stores electrical energy.
Housed in a cylindrical or box-shaped enclosure, a large capacitor is installed inside, equipped with positive and negative terminals—resembling a small battery in appearance.
It is installed close to power-hungry components like amplifiers and connected in parallel with the amplifier’s positive and negative power lines.
Since a capacitor can store and discharge electricity much like a rechargeable battery, when there’s a momentary drop in voltage from the main battery, the capacitor—maintaining a relatively higher voltage—can discharge power to offset that dip. Even though battery voltage dips only for a brief instant, the alternator typically compensates quickly. So for audio purposes, a short backup is sufficient.
In practice, adding a capacitor noticeably clarifies the sound and enhances fine detail, which shows just how much audio quality can be affected by minor voltage fluctuations.
C-4_en. Power Stabilizer (Regulator)

As the name implies, this device actively stabilizes voltage levels.
While a capacitor behaves like a dam or reservoir—supplying power until its voltage drops—a stabilizer goes further by incorporating both step-up and step-down circuitry, in addition to capacitors. This allows it to maintain a fixed voltage output.
Where a capacitor alone may slightly reduce the voltage supplied to the amplifier as it discharges, a stabilizer can boost the voltage when it drops below a specified value, or reduce it when a sudden surge occurs. Some models even allow you to set a target voltage manually. (Among these, Audio-Technica's AT-RX100 is one of the few with built-in step-down capability.)
As mentioned earlier under the capacitor section, voltage stability has a significant impact on sound quality. For systems involving DSPs and multiple amplifiers, we especially recommend incorporating a stabilizer.